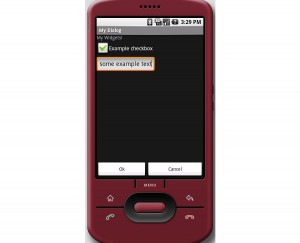
Android dialog Screen Example
This is a basic dialog example that includes a scrolling widget container with an “Ok” and “Cancel” button on the bottom of the screen. This is a general use dialog with a lower case “d” not to be confused with the Android Dialog class. A scrolling area is far from a sophisticated layout design but it is a simple solution for supporting various display sizes. This basic dialog can be used to show user messages, editing of application settings and more. A vertical scrolling layout also future-proofs your applications for distribution on new Android devices with different screen dimensions than what we’re building for today.
Here’s the code for the main Activity class used in this example.
package com.bestsiteinthemultiverse.dialogexample;

import android.app.Activity;
import android.content.Intent;
import android.os.Bundle;
import android.view.Menu;
import android.view.MenuItem;

public class DialogExample extends Activity {

	private static final int MY_DIALOG = 0;

    /** Called when the activity is first created. */
    @Override
    public void onCreate(Bundle savedInstanceState) {
        super.onCreate(savedInstanceState);
        setContentView(R.layout.main);
    }

    // Called only the first time the options menu is displayed.
    // Create the menu entries.
    // Menu adds items in the order shown.
    public boolean onCreateOptionsMenu(Menu menu) {
        super.onCreateOptionsMenu(menu);
        menu.add("Show My Dialog");
        menu.add("Do Something");
        return true;
    }

    // handle menu selected
    public boolean onOptionsItemSelected(MenuItem item){

   	 if (item.getTitle().equals("Show My Dialog")){
            Intent intent = new Intent(this, com.bestsiteinthemultiverse.dialogexample.MyDialogActivity.class);
            startActivityForResult(intent, MY_DIALOG);
            return true;
   	 }

   	 if (item.getTitle().equals("Do Something")){
            // responed to "Do Someting" menu click
   		    // do work here
            return true;
   	 }
        return false;
    }
}
The above activity renders a simple screen with a text message. Here’s the layout xml.
<?xml version="1.0" encoding="utf-8"?>
<LinearLayout xmlns:android="http://schemas.android.com/apk/res/android"
    android:orientation="vertical"
    android:layout_width="fill_parent"
    android:layout_height="fill_parent"
    >
<TextView
    android:layout_width="fill_parent"
    android:layout_height="wrap_content"
    android:text="@string/hello"
    />
</LinearLayout>
The dialog screen also has an associated Activity class named MyDialogActivity that’s responsible for loading the layout, capturing the button click events, populating the screen and persisting screen values.
package com.bestsiteinthemultiverse.dialogexample;

import com.bestsiteinthemultiverse.dialogexample.R;

import android.app.Activity;
import android.os.Bundle;
import android.view.View;
import android.widget.Button;
import android.widget.CheckBox;
import android.widget.EditText;

public class MyDialogActivity extends Activity {

    /** Called when the activity is first created. */
    @Override
    public void onCreate(Bundle savedInstanceState) {
        super.onCreate(savedInstanceState);
        setContentView(R.layout.mydialog);

        populateWidgets();
        // setup handler for Ok button
        Button btnOk = (Button) findViewById(R.id.btnOk);
        btnOk.setOnClickListener(new View.OnClickListener() {
           public void onClick(View arg0) {
        	   persistWidgetData();
	           setResult(RESULT_OK);
	           finish();
           }
        });
        // setup handler for the Cancel button
        Button btnCancel = (Button) findViewById(R.id.btnCancel);
        btnCancel.setOnClickListener(new View.OnClickListener() {
            public void onClick(View arg0) {
 	           setResult(RESULT_CANCELED);
 	           finish();
            }
         });

    }

    private void populateWidgets(){
    	// do work here to populate widgets
    	// checkbox
    	CheckBox chkExample = (CheckBox) findViewById(R.id.chkExample);
    	chkExample.setChecked(true);
    	// edit
    	EditText editExample = (EditText) findViewById(R.id.editExample);
    	editExample.setText("some example text");
    }

    private void persistWidgetData(){
    	// do work here to persist values from widgets
    	// see: http://code.google.com/android/devel/data.html
    }
}
The xml layout for the dialog screen. Add your widgets after the “your widgets go here” comment line . If there too many widgets for the vertical space available on the screen the ScrollView container will allow scrolling. The ScrollView contains a LinearLayout with vertical orientation which is then used to contain widgets.
<?xml version="1.0" encoding="utf-8"?>
<LinearLayout
android:id="@+id/linlayoutBase"
android:layout_width="fill_parent"
android:layout_height="fill_parent"
android:orientation="vertical"
xmlns:android="http://schemas.android.com/apk/res/android"
>

		<ScrollView
		android:id="@+id/scrollview"
		android:layout_width="fill_parent"
		android:layout_height="wrap_content"
		android:layout_weight="1"
		>

		<LinearLayout
		android:id="@+id/widget30"
		android:layout_width="fill_parent"
		android:layout_height="wrap_content"
		android:orientation="vertical"
		>
		    <!--  your widgets go here -->
			<TextView
			android:id="@+id/txtExample"
			android:layout_width="wrap_content"
			android:layout_height="wrap_content"
			android:text="My Widgets!"
			>
			</TextView>

			<CheckBox
			android:id="@+id/chkExample"
			android:layout_width="wrap_content"
			android:layout_height="wrap_content"
			android:text="Example checkbox"
			>
			</CheckBox>

			<EditText
			android:id="@+id/editExample"
			android:layout_width="wrap_content"
			android:layout_height="wrap_content"
			android:text=""
			android:textSize="18sp"
			>
			</EditText>

			<!--  end your widgets -->

		</LinearLayout>

		</ScrollView>

		<LinearLayout
		android:id="@+id/linlayoutButtons"
		android:layout_width="fill_parent"
		android:layout_height="wrap_content"
		android:layout_weight="0"
		>
		<Button
		android:id="@+id/btnOk"
		android:layout_width="wrap_content"
		android:layout_height="wrap_content"
		android:text="Ok"
		android:layout_weight="1"
		>
		</Button>
		<Button
		android:id="@+id/btnCancel"
		android:layout_width="wrap_content"
		android:layout_height="wrap_content"
		android:text="Cancel"
		android:layout_weight="1"
		>
		</Button>
	</LinearLayout>
</LinearLayout>
When a new Activity is added to an Android application, it also needs to be added to the manifest xml file. See the entry for “.MyDialogActivity” below.
<?xml version="1.0" encoding="utf-8"?>
<manifest xmlns:android="http://schemas.android.com/apk/res/android"
      package="com.bestsiteinthemultiverse.dialogexample"
      android:versionCode="1"
      android:versionName="1.0.0">
    <application android:icon="@drawable/icon" android:label="@string/app_name">
        <activity android:name=".DialogExample"
                  android:label="@string/app_name">
            <intent-filter>
                <action android:name="android.intent.action.MAIN" />
                <category android:name="android.intent.category.LAUNCHER" />
            </intent-filter>
        </activity>
        <activity android:name=".MyDialogActivity" android:label="My Dialog">
        </activity>
    </application>
</manifest>
Hope you find this useful and remember, code like the wind.

Nice article bro —
Where are you dealing with your response returned from the dialog?
Scot
Just wanted to say thanks for the dialog example…much clearer than the Android docs
Very good Example…Thanks a lot…