Android Selected State ListView Example
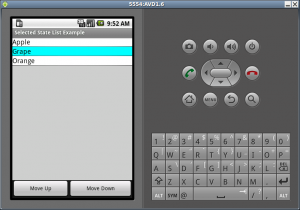
Sometimes we need to maintain the selected position in a list. This example was taken from a real-world, off-road application where users interact with the application in a bumpy environment and need a fool proof way of changing the sort order of items in a list. When an item is clicked in the list and that row becomes the selected row as indicated by a different background color. The user can then change the position of the selected row using the Move Up and Move Down buttons on the screen.
Here’s a screen-shot of this example running in the emulator.
Keeping State
Where do we keep the selected state if the view component doesn’t support this? I considered extending data objects to maintain selected state but that would only pollute data objects with view-only state information. Another thought was to extend List and keep the state there. But that would mean shoehorning view-only state info into already stable and settled Lists used throughout the application. In the end, it was decided that a custom ArrayAdapter, SelectedAdapter, was the best place to keep this state. We only care about the selected state during the lifespan of the ListView, no reason to lug around extra baggage. This turned out to be a very simple solution.
The Activity class for this example loads the view and has event handlers for list item selection and the Move Up and Move Down buttons.
package com.bestsiteinthemultiverse.selected;

import java.util.ArrayList;
import android.app.Activity;
import android.os.Bundle;
import android.view.View;
import android.widget.AdapterView;
import android.widget.Button;
import android.widget.ListView;
import android.widget.AdapterView.OnItemClickListener;

public class SelectedActivity extends Activity {

	private SelectedAdapter selectedAdapter;
	private ArrayList list;

	@Override
	protected void onCreate(Bundle savedInstanceState) {
		super.onCreate(savedInstanceState);
		setContentView(R.layout.selected_example);

		// populate the model - a simple a list
		list = new ArrayList();
		list.add("Apple");
		list.add("Orange");
		list.add("Grape");

		// create our SelectedAdapter
		selectedAdapter = new SelectedAdapter(this,0,list);
		selectedAdapter.setNotifyOnChange(true);

        ListView listview = (ListView) findViewById(R.id.listExample);
        listview.setAdapter(selectedAdapter);

        listview.setOnItemClickListener(new OnItemClickListener() {
			@Override
			public void onItemClick(AdapterView arg0, View view,
                                           int position, long id) {
				// user clicked a list item, make it "selected"
				selectedAdapter.setSelectedPosition(position);
			}
        });

        // move up event handler
        Button btnMoveUp = (Button) findViewById(R.id.btnMoveUp);
        btnMoveUp.setOnClickListener(new View.OnClickListener() {
           public void onClick(View arg0) {
        	   moveUp();
           }
        });

        // move down event handler
        Button btnMoveDown = (Button) findViewById(R.id.btnMoveDown);
        btnMoveDown.setOnClickListener(new View.OnClickListener() {
           public void onClick(View arg0) {
        	   moveDown();
           }
        });
	}

	// Move selected item "up" in the ViewList.
	private void moveUp(){
    	int selectedPos = selectedAdapter.getSelectedPosition();
    	if (selectedPos > 0 ){
    		String str = list.remove(selectedPos);
    		list.add(selectedPos-1, str);
    		// set selected position in the adapter
    		selectedAdapter.setSelectedPosition(selectedPos-1);
    	}
	}

	// Move selected item "down" in the ViewList.
	private void moveDown(){
    	int selectedPos = selectedAdapter.getSelectedPosition();
    	if (selectedPos < list.size()-1 ){
    		String str = list.remove(selectedPos);
    		list.add(selectedPos+1, str);
    		// set selected position in the adapter
    		selectedAdapter.setSelectedPosition(selectedPos+1);
    	}
	}

}
The SelectedAdapter class used in this example does three things: it extends ArrayAdapter, maintains the selected state and loads a custom row view. If that row is the selected row, a background color is applied to indicate the selected state. If you need to use something other than .toString() to describe your objects, call your method in the overridden getView(). Another thing to notice is the reference for convertView is reused from call-to-call. This saves the expense of inflating the layout every time getView() is called.
package com.bestsiteinthemultiverse.selected;

	import java.util.List;
	import android.content.Context;
	import android.graphics.Color;
	import android.view.LayoutInflater;
	import android.view.View;
	import android.view.ViewGroup;
	import android.widget.ArrayAdapter;
	import android.widget.TextView;

	public class SelectedAdapter extends ArrayAdapter{

		// used to keep selected position in ListView
		private int selectedPos = -1;	// init value for not-selected

		public SelectedAdapter(Context context, int textViewResourceId,
                           List objects) {
			super(context, textViewResourceId, objects);
		}


		public void setSelectedPosition(int pos){
			selectedPos = pos;
			// inform the view of this change
			notifyDataSetChanged();
		}

		public int getSelectedPosition(){
			return selectedPos;
		}

		@Override
		public View getView(int position, View convertView, ViewGroup parent) {
		    View v = convertView;

		    // only inflate the view if it's null
		    if (v == null) {
		        LayoutInflater vi
                            = (LayoutInflater)this.getContext().getSystemService(Context.LAYOUT_INFLATER_SERVICE);
		        v = vi.inflate(R.layout.selected_row, null);
		    }

		    // get text view
	        TextView label = (TextView)v.findViewById(R.id.txtExample);

	        // change the row color based on selected state
	        if(selectedPos == position){
	        	label.setBackgroundColor(Color.CYAN);
	        }else{
	        	label.setBackgroundColor(Color.WHITE);
	        }

	        label.setText(this.getItem(position).toString());
	        /*
	        // to use something other than .toString()
	        MyClass myobj = (MyClass)this.getItem(position);
	        label.setText(myobj.myReturnsString());
	        */
	        return(v);
		}
	}
The layout xml used for the row view.
<?xml version="1.0" encoding="utf-8"?>

<TextView android:id="@+id/txtExample"
    xmlns:android="http://schemas.android.com/apk/res/android"
    android:layout_width="fill_parent"
    android:layout_height="wrap_content"
    android:textSize="18sp"
    android:textColor="#000000"
    android:background="#FF0000"
/>
The ListView declaration from the layout xml used in this example.
	<ListView
	android:id="@+id/listExample"
        android:layout_width="fill_parent"
        android:layout_height="fill_parent"
        android:background="#CCCCCC"
        android:choiceMode="singleChoice"
         />

After one week search finally, i followed your steps in the code to implement my app, it worked.
Thanks again.
awesome solution. this is probably the only article on the internet that solves this problem. helped me out a ton.
Your Awesome..
We were having trouble with highlighting selected ListView Item..
Thanks like hell