Android Graphics Example
This example demonstrates basic drawing concepts using the Google Android SDK. The best way to understand a drawing api is to actually use it. This example extends Activity, creates a subclass of View and overrides the View.onDraw(). All of the drawing code in this example is located in the onDraw() method.
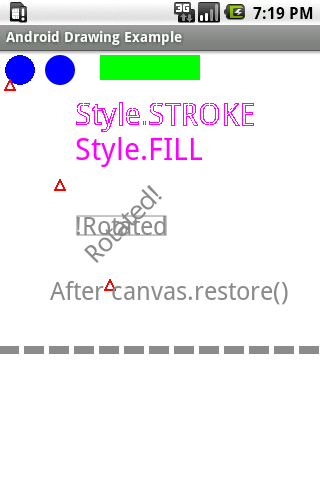
Let’s take a quick tour of the DrawDemo screenshot. The blue circle in the upper left corner was drawn without anti-aliasing, notice the jagged circumference. The blue circle on the right was drawn with anti-aliasing turned on, thus the smooth circumference. “Style.STROKE” was drawn with Paint.Style.STROKE and paint.setAntiAlias(false). “Style.FILL” was drawn with Paint.Style.FILL and paint.setAntiAlias(true). A box was drawn around “!Rotated” by getting a bounding Rect that surrounds that same text. The “Rotated!” text was drawn by first rotating the canvas by 45 degrees, pivoting on the bounding Rect center point and then drawing the text. The triangles demonstrate using the Shape class and using a single instance to draw the shape at different locations with the Shape offset method. The “After canvas.restore()” text demonstrates how to undo the canvas.rotate(); Finally, there’s a an example of how to draw a dashed line using a DashPathEffect.
Here’s the source code for the DrawDemo application:
import android.app.Activity;
import android.content.Context;
import android.graphics.Canvas;
import android.graphics.Color;
import android.graphics.DashPathEffect;
import android.graphics.Paint;
import android.graphics.Path;
import android.graphics.Rect;
import android.os.Bundle;
import android.view.View;

public class DrawDemo extends Activity {
	DemoView demoview;
	/** Called when the activity is first created. */
	@Override
	public void onCreate(Bundle savedInstanceState) {
		super.onCreate(savedInstanceState);
		demoview = new DemoView(this);
		setContentView(demoview);
	}

	private class DemoView extends View{
		public DemoView(Context context){
			super(context);
		}

		@Override protected void onDraw(Canvas canvas) {
			super.onDraw(canvas);

			// custom drawing code here
			// remember: y increases from top to bottom
			// x increases from left to right
			int x = 0;
			int y = 0;
			Paint paint = new Paint();
			paint.setStyle(Paint.Style.FILL);

			// make the entire canvas white
			paint.setColor(Color.WHITE);
			canvas.drawPaint(paint);
			// another way to do this is to use:
			// canvas.drawColor(Color.WHITE);

			// draw a solid blue circle
			paint.setColor(Color.BLUE);
			canvas.drawCircle(20, 20, 15, paint);

			// draw blue circle with antialiasing turned on
			paint.setAntiAlias(true);
			paint.setColor(Color.BLUE);
			canvas.drawCircle(60, 20, 15, paint);

			// compare the above circles once drawn
			// the fist circle has a jagged perimeter
			// the second circle has a smooth perimeter

			// draw a solid green rectangle
			paint.setAntiAlias(false);
			paint.setColor(Color.GREEN);
			canvas.drawRect(100, 5, 200, 30, paint);

			// create and draw triangles
			// use a Path object to store the 3 line segments
			// use .offset to draw in many locations
			// note: this triangle is not centered at 0,0
			paint.setStyle(Paint.Style.STROKE);
			paint.setStrokeWidth(2);
			paint.setColor(Color.RED);
			Path path = new Path();
			path.moveTo(0, -10);
			path.lineTo(5, 0);
			path.lineTo(-5, 0);
			path.close();
			path.offset(10, 40);
			canvas.drawPath(path, paint);
			path.offset(50, 100);
			canvas.drawPath(path, paint);
			// offset is cumlative
			// next draw displaces 50,100 from previous
			path.offset(50, 100);
			canvas.drawPath(path, paint);

			// draw some text using STROKE style
			paint.setStyle(Paint.Style.STROKE);
			paint.setStrokeWidth(1);
			paint.setColor(Color.MAGENTA);
			paint.setTextSize(30);
			canvas.drawText("Style.STROKE", 75, 75, paint);

			// draw some text using FILL style
			paint.setStyle(Paint.Style.FILL);
			//turn antialiasing on
			paint.setAntiAlias(true);
			paint.setTextSize(30);
			canvas.drawText("Style.FILL", 75, 110, paint);

			// draw some rotated text
			// get text width and height
			// set desired drawing location
			x = 75;
			y = 185;
			paint.setColor(Color.GRAY);
			paint.setTextSize(25);
			String str2rotate = "Rotated!";

			// draw bounding rect before rotating text
			Rect rect = new Rect();
			paint.getTextBounds(str2rotate, 0, str2rotate.length(), rect);
			canvas.translate(x, y);
			paint.setStyle(Paint.Style.FILL);
			// draw unrotated text
			canvas.drawText("!Rotated", 0, 0, paint);
			paint.setStyle(Paint.Style.STROKE);
			canvas.drawRect(rect, paint);
			// undo the translate
			canvas.translate(-x, -y);

			// rotate the canvas on center of the text to draw
			canvas.rotate(-45, x + rect.exactCenterX(),
                                               y + rect.exactCenterY());
			// draw the rotated text
			paint.setStyle(Paint.Style.FILL);
			canvas.drawText(str2rotate, x, y, paint);

			//undo the rotate
			canvas.restore();
			canvas.drawText("After canvas.restore()", 50, 250, paint);

			// draw a thick dashed line
			DashPathEffect dashPath =
                            new DashPathEffect(new float[]{20,5}, 1);
			paint.setPathEffect(dashPath);
			paint.setStrokeWidth(8);
			canvas.drawLine(0, 300 , 320, 300, paint);

		}
	}
}

good simple program to try out various things and understand the concept !
thanks
Hell yeah!
After a whole day of sifting through the Google Android site, finally a simple and useful set of examples.
You are the man!
Thx!, great help
Thanks for the code. Very useful! Can you answer how you would clear the screen? I mean, I know how to make menus, they’re pretty simple, but what would the method look like to clear the screen?
Ditto. 😀
Too good… It was all I needed to start in Android
Thanks a lot.
Really needed a canvas example. Thanks a lot.
Awesome stuff dude.. Love this simple code.
Thanks dude..I am searching for this thing since last three days. But no where they have given as simple as you given. chaala chaala thanks.
Damn! I spent all day surfing in Android’s webpage figuring out how to draw a f!&%ing circle and nothing.
This is all what I was looking for, thanks man!
You are my new personal hero!
Awesome! Thank you!